
主题
构建 MCP App
使用 MCP Apps 构建交互式 UI 应用的入门指南
前置条件
你需要 Node.js 18 或更高版本。建议熟悉 MCP 工具 和 资源,因为 MCP Apps 结合了这两种原语。具备 MCP TypeScript SDK 的使用经验将有助于你更好地理解服务端模式。
快速开始
创建 MCP App 最快的方式是使用带有 MCP Apps skill 的 AI 编码代理。如果你更倾向于手动搭建项目,请跳到 手动搭建。
使用 AI 编码代理
支持 Skills 的 AI 编码代理可以为你搭建一个完整的 MCP App 项目。Skills 是包含指令和资源的文件夹,你的代理会在相关时加载它们。它们教会 AI 如何执行诸如创建 MCP Apps 之类的专门任务。
create-mcp-app skill 包含架构指导、最佳实践和可运行的示例,代理会使用它们来生成你的项目。
安装 skill
如果你使用的是 Claude Code,可以直接通过以下命令安装该 skill:

```
/plugin marketplace add modelcontextprotocol/ext-apps
/plugin install mcp-apps@modelcontextprotocol-ext-apps
```

你也可以使用 [Vercel Skills CLI](https://skills.sh/) 在不同的 AI 编码代理中安装 skills:

```bash
npx skills add modelcontextprotocol/ext-apps
```

或者,你可以通过克隆 ext-apps 仓库来手动安装该 skill:

```bash
git clone https://github.com/modelcontextprotocol/ext-apps.git
```

然后将该 skill 复制到适合你的代理的位置:

| Agent                                                                                                                                                                        | Skills 目录 (macOS/Linux)      | Skills 目录 (Windows)                 |
| ---------------------------------------------------------------------------------------------------------------------------------------------------------------------------- | ------------------------------ | ------------------------------------- |
| [Claude Code](https://docs.anthropic.com/en/docs/claude-code/skills)                                                                                                         | `~/.claude/skills/`            | `%USERPROFILE%\.claude\skills\`       |
| [VS Code](https://code.visualstudio.com/docs/copilot/customization/agent-skills) and [GitHub Copilot](https://docs.github.com/en/copilot/concepts/agents/about-agent-skills) | `~/.copilot/skills/`           | `%USERPROFILE%\.copilot\skills\`      |
| [Gemini CLI](https://geminicli.com/docs/cli/skills/)                                                                                                                         | `~/.gemini/skills/`            | `%USERPROFILE%\.gemini\skills\`       |
| [Cline](https://cline.bot/blog/cline-3-48-0-skills-and-websearch-make-cline-smarter)                                                                                         | `~/.cline/skills/`             | `%USERPROFILE%\.cline\skills\`        |
| [Goose](https://goose-docs.ai/docs/guides/context-engineering/using-skills/)                                                                                                 | `~/.config/goose/skills/`      | `%USERPROFILE%\.config\goose\skills\` |
| [Codex](https://developers.openai.com/codex/skills/)                                                                                                                         | `~/.codex/skills/`             | `%USERPROFILE%\.codex\skills\`        |
| [Cursor](https://cursor.com/docs/context/skills)                                                                                                                             | `~/.cursor/skills/`            | `%USERPROFILE%\.cursor\skills\`       |
NOTE
此列表并不全面。其他代理可能在不同位置支持 skills;请查阅你的代理文档。
例如,使用 Claude Code 时,你可以全局安装该 skill(在所有项目中可用):
bash
cp -r ext-apps/plugins/mcp-apps/skills/create-mcp-app ~/.claude/skills/create-mcp-apppowershell
Copy-Item -Recurse ext-apps\plugins\mcp-apps\skills\create-mcp-app $env:USERPROFILE\.claude\skills\create-mcp-app或者仅将其安装到单个项目中,方法是复制到项目目录下的 `.claude/skills/`:
bash
mkdir -p .claude/skills && cp -r ext-apps/plugins/mcp-apps/skills/create-mcp-app .claude/skills/create-mcp-apppowershell
New-Item -ItemType Directory -Force -Path .claude\skills | Out-Null; Copy-Item -Recurse ext-apps\plugins\mcp-apps\skills\create-mcp-app .claude\skills\create-mcp-app要验证该 skill 已安装,请询问你的代理 "What skills do you have access to?" —— 你应该会看到 `create-mcp-app` 是可用 skills 之一。
创建你的应用
让你的 AI 编码代理来构建它:

```
Create an MCP App that displays a color picker
```

代理会识别出 `create-mcp-app` skill 是相关的,加载其指令,然后搭建一个包含服务端、UI 和配置文件的完整项目。

<Frame caption="使用 Claude Code 创建新的 MCP App">

  <img loading="lazy" src="/mcp-img/bbbf4dddb768.png" alt="Creating a new MCP App with Claude Code" width="800" height="563" data-path="images/quickstart-apps/create-mcp-app-skill.gif" />


</Frame>
运行你的应用
bash
npm install && npm run build && npm run servepowershell
npm install; npm run build; npm run serveTIP
在运行上述命令之前,你可能需要确保自己首先位于 app 文件夹中。
测试你的应用
按照下方 [测试你的应用](#测试你的应用) 中的说明操作。对于颜色选择器示例,开始一个新对话并让 Claude 为你提供一个颜色选择器。

<Frame caption="在 Claude 中测试颜色选择器">

  <img loading="lazy" src="/mcp-img/b66c8697c9ab.png" alt="Testing the color picker in Claude" width="800" height="544" data-path="images/quickstart-apps/test-color-picker.gif" />


</Frame>
手动搭建
如果你不使用 AI 编码代理,或者更想了解搭建过程,请按照以下步骤操作。
创建项目结构
一个典型的 MCP App 项目将服务端代码与 UI 代码分开:

<Tree>

  <TreeFolder name="my-mcp-app" defaultOpen>
    <TreeFile name="package.json" />

    <TreeFile name="tsconfig.json" />

    <TreeFile name="vite.config.ts" />

    <TreeFile name="server.ts" comment="MCP server with tool + resource" />

    <TreeFile name="mcp-app.html" comment="UI entry point" />

    <TreeFolder name="src" defaultOpen>
      <TreeFile name="mcp-app.ts" comment="UI logic" />
    </TreeFolder>
  </TreeFolder>


</Tree>

服务端注册工具并提供 UI 资源。UI 资源最终将在一个采用默认拒绝 CSP 配置的安全 iframe 中渲染。如果你的应用有 CSS 和 JS 资源,你需要[配置 CSP](https://apps.extensions.modelcontextprotocol.io/api/documents/Patterns.html#configuring-csp-and-cors),或者使用诸如 `vite-plugin-singlefile` 之类的工具将资源打包进 HTML,这也是本教程将采用的做法。
安装依赖
```bash
npm install @modelcontextprotocol/ext-apps @modelcontextprotocol/sdk
npm install -D typescript vite vite-plugin-singlefile express cors @types/express @types/cors tsx
```

`ext-apps` 包为服务端(注册工具和资源)和客户端(用于 UI 与宿主通信的 `App` 类)都提供了辅助工具。这里使用带有 `vite-plugin-singlefile` 插件的 Vite 将你的 UI 和资源打包成单个 HTML 文件以便于使用,但这是可选的 —— 如果你[配置 CSP](https://apps.extensions.modelcontextprotocol.io/api/documents/Patterns.html#configuring-csp-and-cors),也可以使用任何打包器或直接提供未打包的文件。
配置项目
"type": "module" 设置启用 ES 模块语法。build 脚本使用 INPUT 环境变量来告诉 Vite 要打包哪个 HTML 文件。serve 脚本使用 tsx 运行你的服务端以执行 TypeScript。
json
{
  "type": "module",
  "scripts": {
    "build": "INPUT=mcp-app.html vite build",
    "serve": "npx tsx server.ts"
  }
}构建项目
项目结构和配置就绪后,继续阅读下方 [构建 MCP App](#构建-mcp-app-1) 来实现服务端和 UI。
构建 MCP App
让我们构建一个显示当前服务端时间的简单应用。此示例演示了完整的模式:注册带有 UI 元数据的工具、将打包后的 HTML 作为资源提供,以及构建一个与服务端通信的 UI。
服务端实现
服务端需要做两件事:注册一个包含 _meta.ui.resourceUri 字段的工具,以及注册一个提供打包后 HTML 的资源处理器。以下是完整的服务端文件:
typescript
// server.ts
console.log("Starting MCP App server...");

import { McpServer } from "@modelcontextprotocol/sdk/server/mcp.js";
import { StreamableHTTPServerTransport } from "@modelcontextprotocol/sdk/server/streamableHttp.js";
import {
  registerAppTool,
  registerAppResource,
  RESOURCE_MIME_TYPE,
} from "@modelcontextprotocol/ext-apps/server";
import cors from "cors";
import express from "express";
import fs from "node:fs/promises";
import path from "node:path";

const server = new McpServer({
  name: "My MCP App Server",
  version: "1.0.0",
});

// The ui:// scheme tells hosts this is an MCP App resource.
// The path structure is arbitrary; organize it however makes sense for your app.
const resourceUri = "ui://get-time/mcp-app.html";

// Register the tool that returns the current time
registerAppTool(
  server,
  "get-time",
  {
    title: "Get Time",
    description: "Returns the current server time.",
    inputSchema: {},
    _meta: { ui: { resourceUri } },
  },
  async () => {
    const time = new Date().toISOString();
    return {
      content: [{ type: "text", text: time }],
    };
  },
);

// Register the resource that serves the bundled HTML
registerAppResource(
  server,
  resourceUri,
  resourceUri,
  { mimeType: RESOURCE_MIME_TYPE },
  async () => {
    const html = await fs.readFile(
      path.join(import.meta.dirname, "dist", "mcp-app.html"),
      "utf-8",
    );
    return {
      contents: [
        { uri: resourceUri, mimeType: RESOURCE_MIME_TYPE, text: html },
      ],
    };
  },
);

// Expose the MCP server over HTTP
const expressApp = express();
expressApp.use(cors());
expressApp.use(express.json());

expressApp.post("/mcp", async (req, res) => {
  const transport = new StreamableHTTPServerTransport({
    sessionIdGenerator: undefined,
    enableJsonResponse: true,
  });
  res.on("close", () => transport.close());
  await server.connect(transport);
  await transport.handleRequest(req, res, req.body);
});

expressApp.listen(3001, (err) => {
  if (err) {
    console.error("Error starting server:", err);
    process.exit(1);
  }
  console.log("Server listening on http://localhost:3001/mcp");
});让我们分解关键部分:
resourceUri:ui://scheme 告诉宿主这是一个 MCP App 资源。 路径结构是任意的。registerAppTool:注册一个带有_meta.ui.resourceUri字段的工具。 当宿主调用此工具时,UI 会被获取并渲染,工具结果在到达时会被传递给它。registerAppResource:当宿主请求 UI 资源时提供打包后的 HTML。- Express 服务端:在端口 3001 上通过 HTTP 暴露 MCP 服务端。
UI 实现
UI 由一个 HTML 页面和一个使用 App 类与宿主通信的 TypeScript 模块组成。以下是 HTML:
html
<!-- mcp-app.html -->
<!DOCTYPE html>
<html lang="en">
  <head>
    <meta charset="UTF-8" />
    <title>Get Time App</title>
  </head>
  <body>
    <p>
      <strong>Server Time:</strong>
      <code id="server-time">Loading...</code>
    </p>
    <button id="get-time-btn">Get Server Time</button>
    <script type="module" src="/src/mcp-app.ts"></script>
  </body>
</html>以及 TypeScript 模块:
typescript
// src/mcp-app.ts
import { App } from "@modelcontextprotocol/ext-apps";

const serverTimeEl = document.getElementById("server-time")!;
const getTimeBtn = document.getElementById("get-time-btn")!;

const app = new App({ name: "Get Time App", version: "1.0.0" });

// Establish communication with the host
app.connect();

// Handle the initial tool result pushed by the host
app.ontoolresult = (result) => {
  const time = result.content?.find((c) => c.type === "text")?.text;
  serverTimeEl.textContent = time ?? "[ERROR]";
};

// Proactively call tools when users interact with the UI
getTimeBtn.addEventListener("click", async () => {
  const result = await app.callServerTool({
    name: "get-time",
    arguments: {},
  });
  const time = result.content?.find((c) => c.type === "text")?.text;
  serverTimeEl.textContent = time ?? "[ERROR]";
});关键部分:
app.connect():与宿主建立通信。在你的应用初始化时调用一次。app.ontoolresult:当宿主向你的应用推送工具结果时触发的回调(例如,当工具首次被调用且 UI 渲染时)。app.callServerTool():让你的应用主动调用服务端上的工具。 请记住,每次调用都涉及一次到服务端的往返,因此请设计你的 UI 以优雅地处理延迟。
App 类还提供了用于日志记录、打开 URL 以及使用来自你应用的结构化数据更新模型上下文的其他方法。请参阅完整的 API 文档。
测试你的应用
要测试你的 MCP App,请构建 UI 并启动你的本地服务端:
bash
npm run build && npm run servepowershell
npm run build; npm run serve在默认配置下,你的服务端将位于 http://localhost:3001/mcp。但是,要看到你的应用渲染,你需要一个支持 MCP Apps 的 MCP 宿主。你有几个选项。
使用 Claude 测试
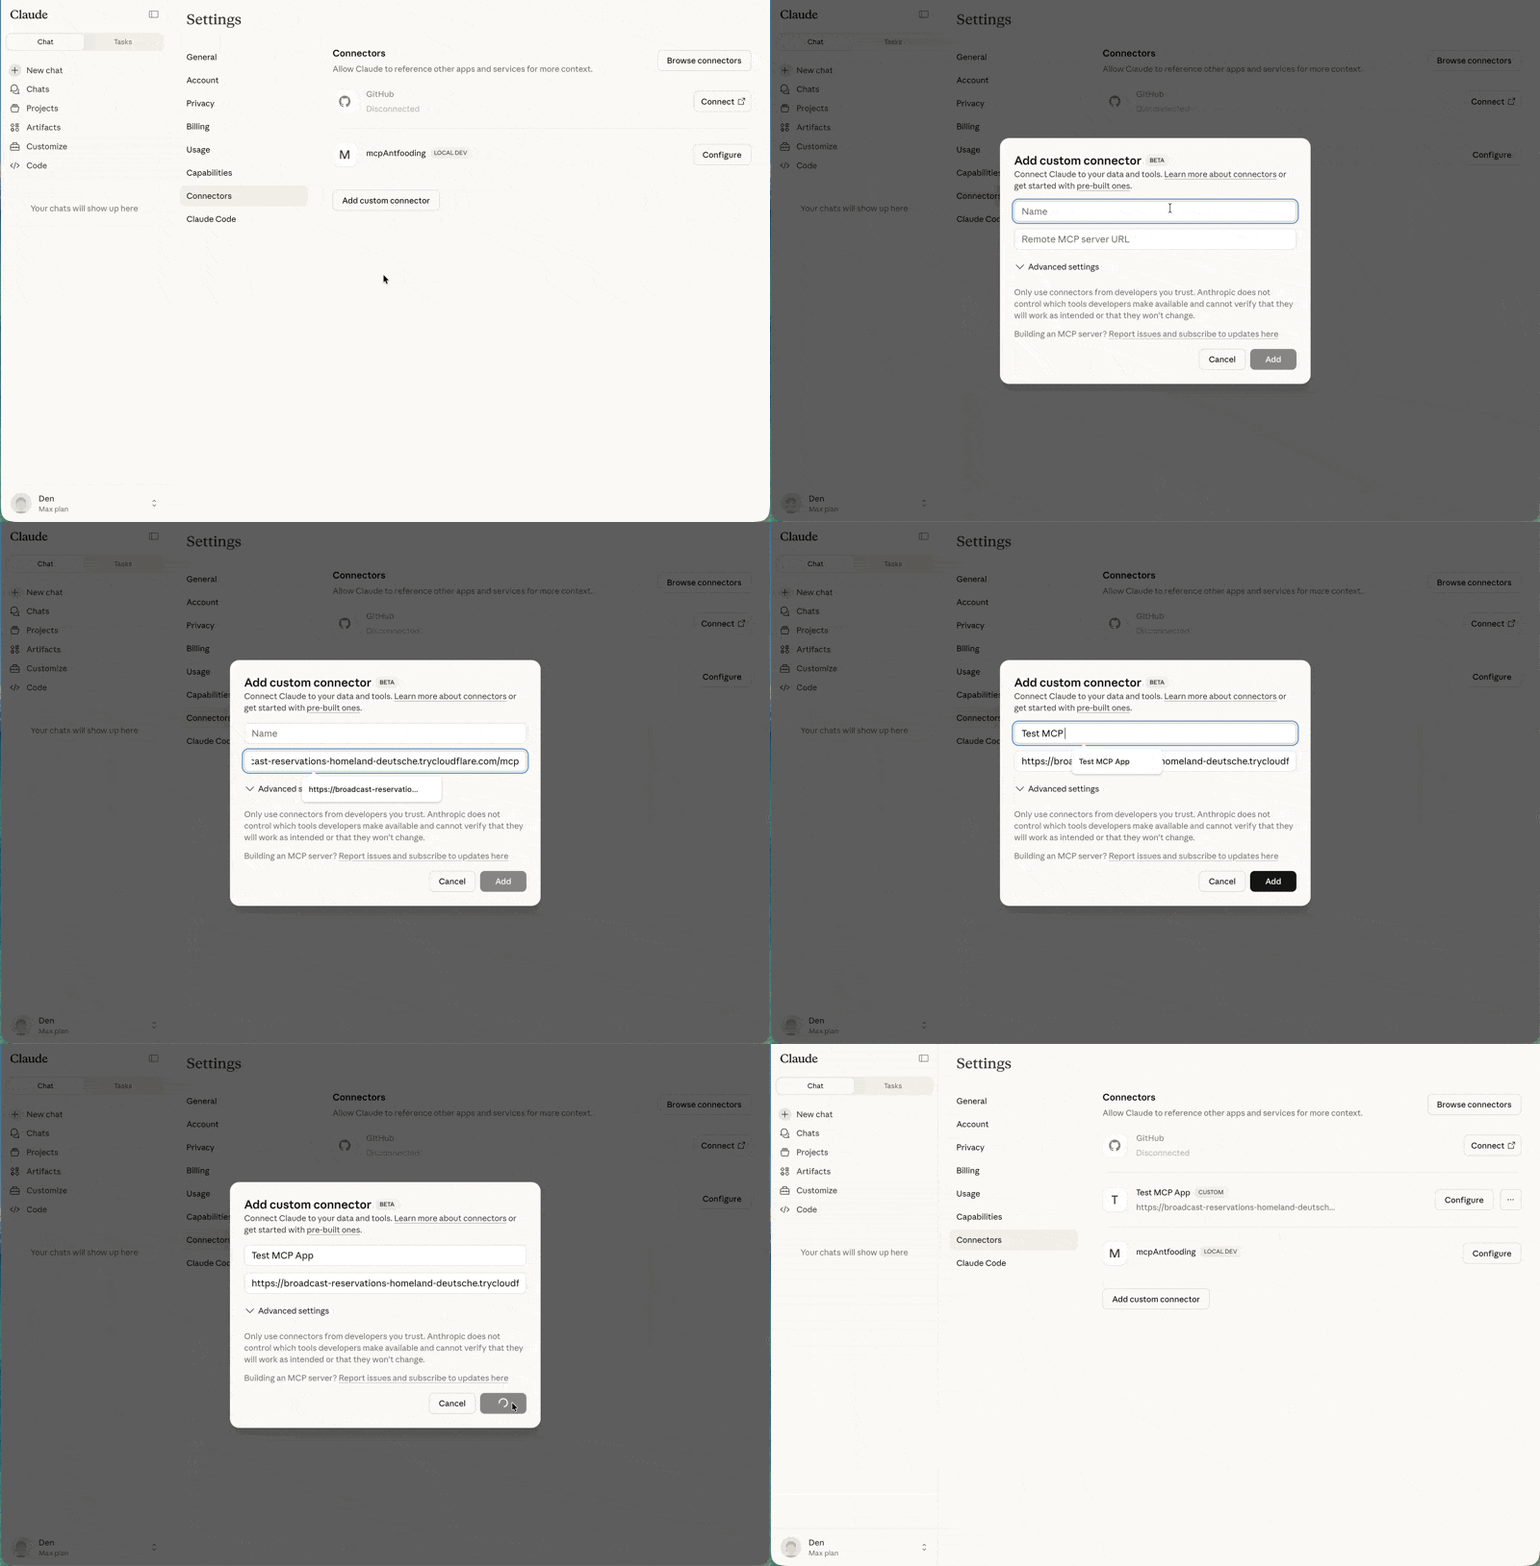
Claude(网页版)和 Claude Desktop 支持 MCP Apps。对于本地开发,你需要将你的服务端暴露到互联网。你可以在本地运行 MCP 服务端,并使用诸如 cloudflared 之类的工具来隧道传输流量。
在单独的终端中运行:
bash
npx cloudflared tunnel --url http://localhost:3001复制生成的 URL(例如 https://random-name.trycloudflare.com),并将其作为自定义连接器添加到 Claude 中 —— 点击你的个人资料,进入 Settings、Connectors,最后点击 Add custom connector。
NOTE
自定义连接器在付费 Claude 套餐(Pro、Max 或 Team)中可用。
使用 basic-host 测试
ext-apps 仓库包含一个用于开发的测试宿主。克隆该仓库并安装依赖:
bash
git clone https://github.com/modelcontextprotocol/ext-apps.git
cd ext-apps/examples/basic-host
npm installpowershell
git clone https://github.com/modelcontextprotocol/ext-apps.git
cd ext-apps\examples\basic-host
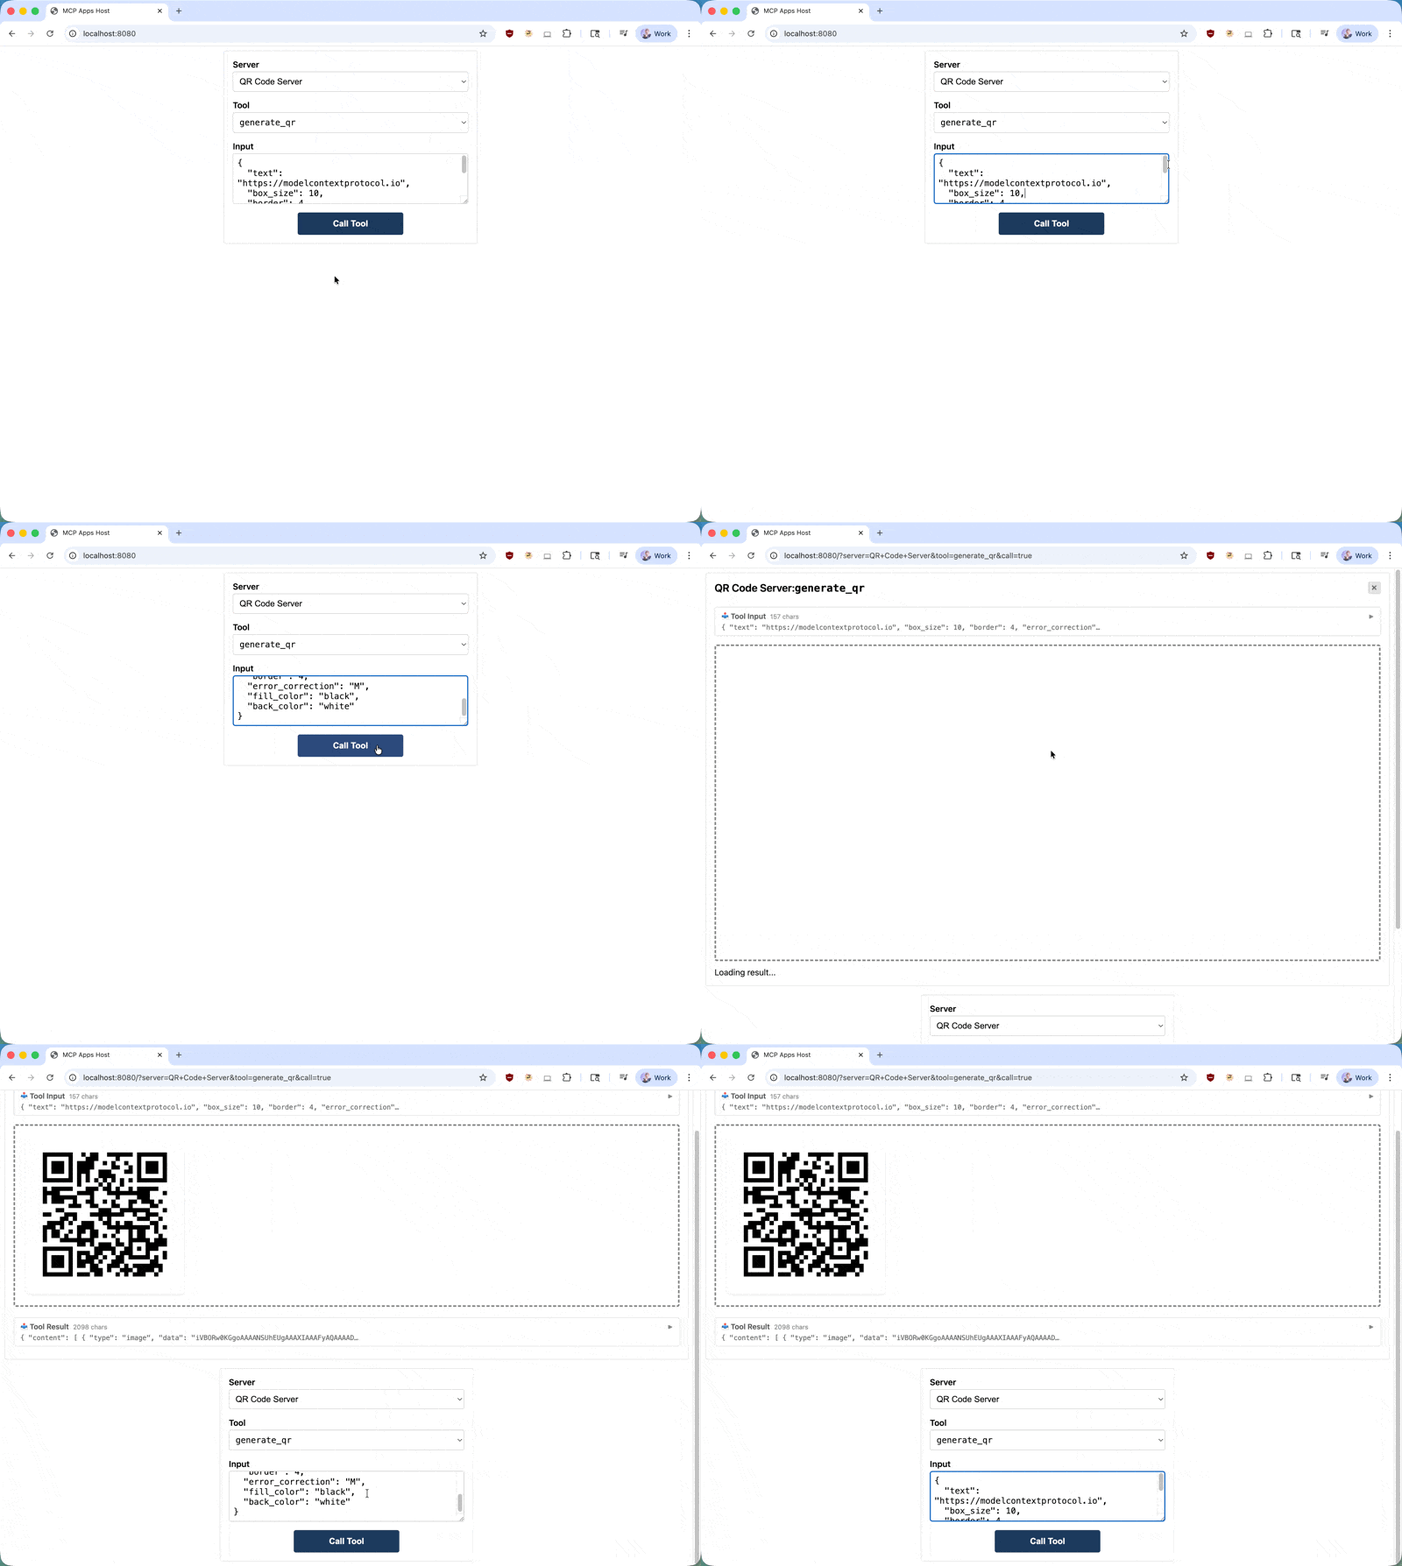
npm install从 ext-apps/examples/basic-host/ 运行 npm start 将启动 basic-host 测试界面。要将其连接到特定服务端(例如你正在开发的服务端),请以内联方式传入 SERVERS 环境变量:
bash
SERVERS='["http://localhost:3001/mcp"]' npm startpowershell
$env:SERVERS='["http://localhost:3001/mcp"]'; npm start导航到 http://localhost:8080。你会看到一个简单的界面,可以在其中选择一个工具并调用它。当你调用你的工具时,宿主会获取 UI 资源并在沙箱化的 iframe 中渲染它。然后你可以与你的应用交互,并验证工具调用是否正常工作。
了解更多
API Documentation
Full SDK reference and API details
GitHub Repository
Source code, examples, and issue tracker
Specification
Technical specification for implementers
反馈
MCP Apps 正在积极开发中。如果你遇到问题或有改进的想法,请在 GitHub 仓库上提交 issue。 有关该扩展方向的更广泛讨论,请加入 GitHub Discussions 中的对话。