
主题
设置 LLM auth 代理
部署一个基于 Envoy 的 auth 代理,它验证 LangSmith 签名的 JWT 并把 LLM 请求路由到你的上游提供商或网关。
LLM auth 代理让你的组织对从 LangSmith 发起的所有模型调用强制施加它自己的身份验证流程,从而提供商凭据永不暴露给终端用户,且每个请求都可回溯到一个特定主体。
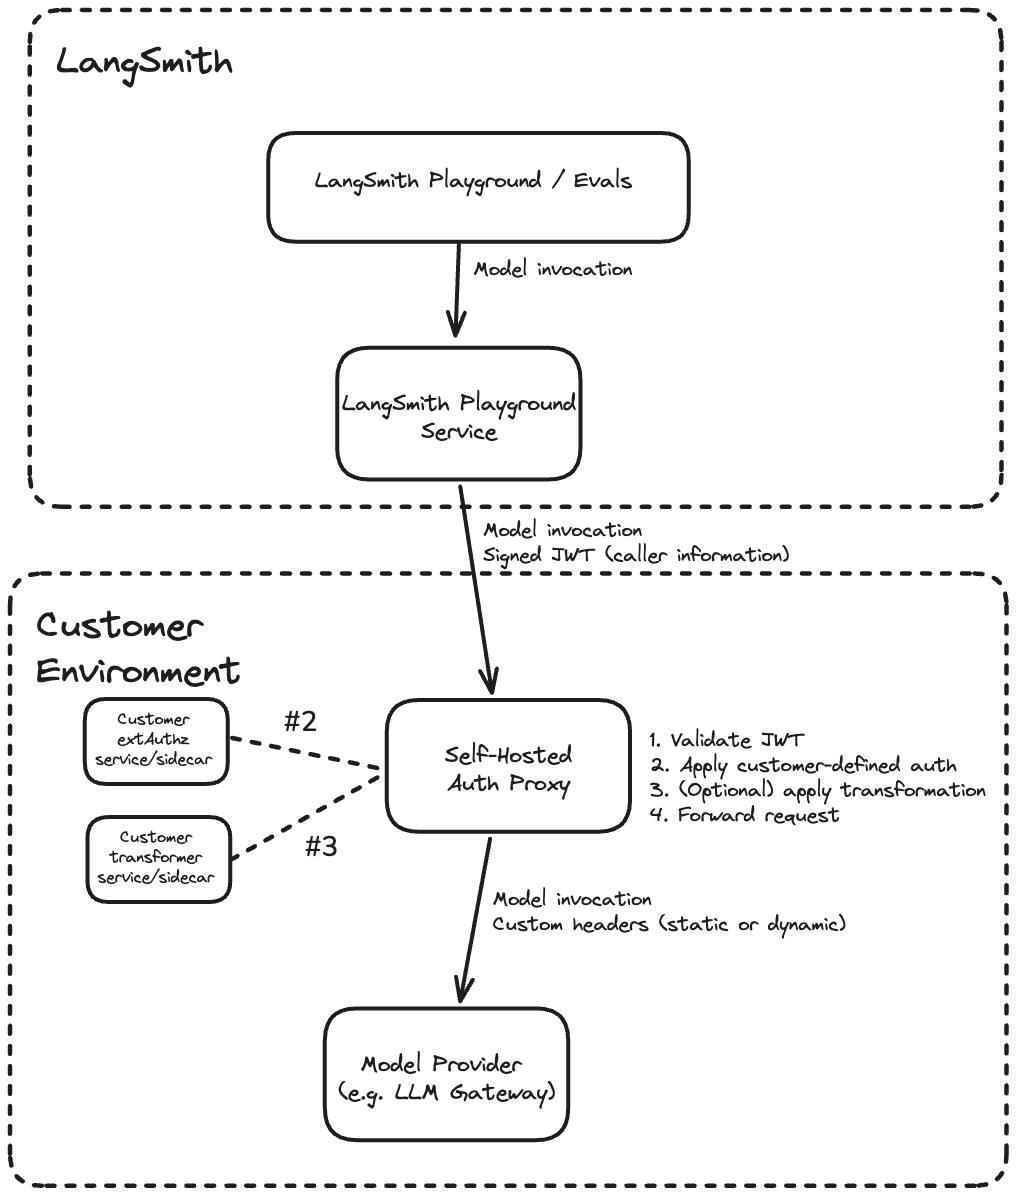
LLM auth 代理是一个基于 Envoy 的组件,运行在你的环境中,位于 LangSmith 与你的上游 LLM 提供商或网关(例如 OpenAI、Anthropic,或像 LiteLLM 这样的内部 LLM 网关)之间。LangSmith 用一个短生命周期的 JWT(JSON Web Token)签名每个请求。代理验证该 JWT,可选地注入提供商凭据或变换请求和响应体,然后把请求转发到上游。它对 SaaS 和 自托管 LangSmith 客户都可用。
在以下情形使用 LLM auth 代理:
- 针对你自己的提供商网关为 Playground 或 LLM-as-judge 评估请求做身份验证。
- 注入提供商专属 API 密钥或 auth 标头而不把它们暴露给终端用户。
- 变换请求或响应体(例如,在 OpenAI 格式和自定义网关格式之间转换)。
尤其对于 OAuth2 client_credentials,模型配置上的 OAuth 客户端凭据是一个按配置、自助的替代方案,工作区管理员无需搭建 auth 代理就能设置它。路由在配置级互斥——一个启用了 OAuth 的配置不通过 auth 代理。
工作原理
从 LangSmith 的每个请求都经过代理中的以下步骤:
- 验证 JWT(签名、签发者、受众)
- 调用你的
ext_authz服务,它接收验证后的 JWT 并返回要作为标头注入的提供商凭据 - 可选地调用你的
ext_proc变换器,它能重写请求和响应体(例如,在 OpenAI 格式和自定义网关格式之间转换) - 用自定义标头(静态或动态)把请求转发到上游提供商
ext_authz 服务和变换器都是客户部署的组件,在你的环境中与代理一起运行。根据你的用例,可以启用其中任一或两者。
前置条件
- LangSmith 企业方案(SaaS 或自托管 0.13.33+)
- 带 Helm 3 的 Kubernetes 集群
- Envoy v1.37 或更高(Helm chart 默认为
envoyproxy/envoy:v1.37-latest) - 你上游 LLM 提供商或网关的 URL(代理将转发请求到的目的地)
NOTE
auth 代理目前支持 Playground、Evals、Fleet、Chat 和 Insights 功能。 Playground 和 Evals 在 v0.13.33+ 可用。Chat 和 Insights 在 v0.13.39+ 可用。
1. 配置 JWT 签名(仅自托管 LangSmith)
对 LangSmith SaaS 跳过这一步。JWT 签名已配好。
生成一对 Ed25519 密钥,用 step CLI(或你偏好的内部流程)。Ed25519 是 LangSmith 用来签名 JWT 的签名算法。私钥签名每个请求;auth 代理只用公钥验证签名。
shell
TMPDIR_KEYS="$(mktemp -d)"
step crypto keypair "$TMPDIR_KEYS/pub.pem" "$TMPDIR_KEYS/priv.pem" \
  --kty OKP --crv Ed25519 --no-password --insecure
PRIV_JWK=$(step crypto key format --jwk --no-password --insecure < "$TMPDIR_KEYS/priv.pem")
SIGNING_JWKS=$(echo "$PRIV_JWK" | jq -c '{keys: [. + {use: "sig", alg: "EdDSA"}]}')
echo "$SIGNING_JWKS"把 JWKS 存在一个 Kubernetes secret 中:
shell
kubectl create secret generic langsmith-signing-jwks \
  --namespace <namespace> \
--from-literal=LANGSMITH_SIGNING_JWKS="$SIGNING_JWKS"JWKS(JSON Web Key Set)是一种发布密钥的标准 JSON 格式。LANGSMITH_SIGNING_JWKS 含 Ed25519 私钥并作为一个 Kubernetes secret 存储。它永不暴露。LangSmith 自动提取对应的公钥并在 /.well-known/jwks.json 上服务它。auth 代理拉取这个公共端点来验证 JWT 签名,而无需私钥。
在你的 LangSmith values.yaml中引用该 secret:
yaml
platformBackend:
  deployment:
    extraEnv:
      - name: LLM_AUTH_PROXY_ISSUER
        value: "langsmith"        # must match jwtIssuer in the auth proxy chart
      - secretRef:
name: langsmith-signing-jwksLLM_AUTH_PROXY_ISSUER 设置签名 JWT 中的 iss 声明。用 langsmith 以匹配 SaaS 默认,或用一个自定义标识符如 langsmith:self-hosted:<short_identifier> 以区分你的安装。该值必须匹配 auth 代理 chart 中的 jwtIssuer(见步骤 4)。
2. 为你的组织启用 LLM Auth Proxy
选项 A: 为一个特定组织启用:
在 LangSmith UI 中,导航到 Settings 页面,复制左上角 Organizations 旁的组织 ID。
对你的 LangSmith PostgreSQL 数据库运行以下内容:
sql
UPDATE organizations
SET config = config || '{"can_use_llm_auth_proxy": true}'
WHERE id = '<organization_id>';选项 B: 为一个安装中的所有组织启用:
把以下内容添加到你的 LangSmith values.yaml 的 commonEnv 中:
yaml
commonEnv:
  - name: DEFAULT_ORG_FEATURE_CAN_USE_LLM_AUTH_PROXY
value: "true"NOTE
此设置对 Personal 组织无影响。
3. 在 LangSmith 中配置组织设置
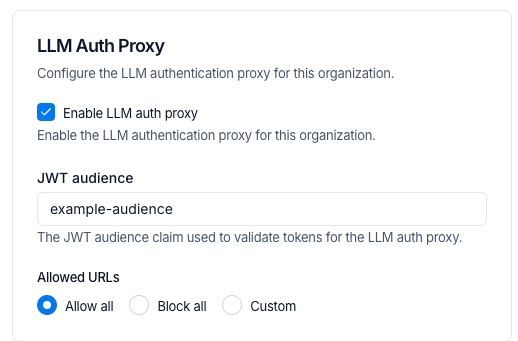
在 LangSmith UI 中,导航到 Settings > General,配置以下内容:
JWT 受众: 代理将验证的
aud声明值(例如example-audience)。它必须匹配 auth 代理 chart 中的jwtAudiences(见步骤 4)。启用 LLM auth 代理: 为你的组织切换为开。
允许的 URL: 控制代理被允许把 JWT 转发到哪些目的地 URL。这防止凭据被转发到非预期的主机。从三个选项中选一个:
- Allow all(默认):允许 JWT 转发到任何上游 URL。等价于无限制。
- Block all: 阻止 JWT 转发到所有 URL。
- Custom: 指定一个允许 URL 模式的显式列表。不接受空字符串和裸
*。当 LLM auth 代理开关为关时,此控件被禁用。
4. 安装 auth 代理 Helm chart
添加 LangChain Helm 仓库:
bash
helm repo add langchain https://langchain-ai.github.io/helm/
helm repo update创建一个含上游 URL 和 JWT 验证设置的 values.yaml。JWKS 配置有两个选项:
jwksUri(推荐): 指向你 LangSmith 实例的/.well-known/jwks.json端点。Envoy 自动拉取并缓存公钥,支持无缝密钥轮换。jwksJson(内联): 把 JWKS JSON 直接粘贴进values.yaml。用它来做测试或 auth 代理对 LangSmith 无出站网络访问的气隙环境。轮换密钥需要一次 chart 更新。只包含公钥组件;省略d字段(私钥)。
如果两者都设置,jwksUri 优先。
yaml
authProxy:
  upstream: "https://gateway.example.com"
  jwtIssuer: "langsmith" # must match LLM_AUTH_PROXY_ISSUER in LangSmith values.yaml
  jwtAudiences:
    - "example-audience" # must match the org setting in LangSmith

  # Option A: remote JWKS (recommended for production)
  # Envoy fetches and caches public keys from LangSmith's /.well-known/jwks.json.
  jwksUri: "https://langsmith.example.com/.well-known/jwks.json"       # self-hosted
  # jwksUri: "https://api.smith.langchain.com/.well-known/jwks.json"   # SaaS
  jwksCacheDurationSeconds: 300

  # Option B: inline JWKS (testing or air-gapped environments only)
  # Omit the "d" field (private key); include public key components only.
# jwksJson: '{"keys": [{"kty": "OKP", "crv": "Ed25519", "x": "<base64url-public-key>", "use": "sig", "alg": "EdDSA"}]}'安装 chart:
bash
helm install langsmith-auth-proxy langchain/langsmith-auth-proxy \
  --namespace <your-namespace> \
-f values.yaml编写一个 ext_authz 服务
当你需要添加、移除或编辑授权标头时用 ext_authz,例如,基于 JWT 中的身份注入一个提供商 API 密钥。你的服务接收验证后的 JWT 以及可选的请求体,并返回要注入上游的标头。这使用 Envoy 的 HTTP ext_authz 过滤器(而非 gRPC)。
在 values.yaml 中启用它:
yaml
authProxy:
  extAuthz:
    enabled: true
    serviceUrl: "http://my-auth-service:8080"
timeout: "10s"工作原理
在转发每个请求之前,Envoy 用与原始请求相同的 HTTP 方法在 <serviceUrl>/check<original_path> 调用你的服务。你的服务在 x-langsmith-llm-auth 标头中接收验证后的 JWT。
你的服务返回一个普通 HTTP 响应:
2xx: 允许该请求。任何匹配allowedUpstreamHeaders模式的标头(默认:authorization和x-*)被注入上游请求。要在转发前剥离 JWT,在你的响应中包含x-envoy-auth-headers-to-remove: x-langsmith-llm-auth。- 非
2xx: 拒绝该请求。状态码和任何匹配allowedClientHeaders模式的标头(默认:www-authenticate和x-*)被返回给客户端。
部署选项
你的 ext_authz 服务能以两种方式运行:
- Sidecar: 在代理所在的同一 pod 中运行服务。在
values.yaml中把容器加到authProxy.deployment.sidecars下,任何所需卷加到authProxy.deployment.volumes下。用一个localhostURL,例如http://localhost:10002。 - 独立部署: 独立部署该服务并把
extAuthz.serviceUrl指向它。用集群内 DNS 名,例如http://my-auth-service.my-namespace.svc.cluster.local:8080,或者如果服务有它自己的 ingress,用一个外部 HTTPS URL。
示例部署
下面的例子是一个最小的 Python ext_authz 服务,它执行一个 OAuth2 客户端凭据令牌交换。在每个请求上,它返回一个缓存的 Authorization 标头,带一个新鲜的访问令牌,在过期前从配置的令牌端点刷新它。完整例子见 chart 仓库中的 e2e/oauth/。
ext-authz-oauth.py
python
"""ext_authz service that performs an OAuth2 client-credentials token exchange.

Runs as a sidecar (or standalone service) alongside the main auth-proxy component.
On each ext_authz check request it returns a cached OAuth access token,
refreshing it from the configured token endpoint when expired.

Environment variables:
  OAUTH_TOKEN_URL    – Token endpoint (e.g. https://login.example.com/oauth/token)
  OAUTH_CLIENT_ID    – Client ID for the credentials grant
  OAUTH_CLIENT_SECRET– Client secret for the credentials grant
  OAUTH_SCOPE        – (optional) Space-separated scopes to request
  LISTEN_PORT        – (optional) Port to listen on, default 10002
"""

from http.server import HTTPServer, BaseHTTPRequestHandler
import json
import os
import sys
import threading
import time
import urllib.request
import urllib.parse

# ---------------------------------------------------------------------------
# Configuration
# ---------------------------------------------------------------------------
TOKEN_URL = os.environ["OAUTH_TOKEN_URL"]
CLIENT_ID = os.environ["OAUTH_CLIENT_ID"]
CLIENT_SECRET = os.environ["OAUTH_CLIENT_SECRET"]
SCOPE = os.environ.get("OAUTH_SCOPE", "")
LISTEN_PORT = int(os.environ.get("LISTEN_PORT", "10002"))

# Refresh the token this many seconds before it actually expires.
EXPIRY_BUFFER_SECONDS = 30

# ---------------------------------------------------------------------------
# Token cache (thread-safe)
# ---------------------------------------------------------------------------
_lock = threading.Lock()
_cached_token: str | None = None
_token_expiry: float = 0  # epoch seconds

def _fetch_token() -> tuple[str, float]:
    """Perform a client_credentials grant and return (access_token, expiry_epoch)."""
    data = urllib.parse.urlencode({
        "grant_type": "client_credentials",
        "client_id": CLIENT_ID,
        "client_secret": CLIENT_SECRET,
        **({"scope": SCOPE} if SCOPE else {}),
    }).encode()

    req = urllib.request.Request(
        TOKEN_URL,
        data=data,
        headers={"Content-Type": "application/x-www-form-urlencoded"},
        method="POST",
    )
    with urllib.request.urlopen(req, timeout=10) as resp:
        body = json.loads(resp.read())

    access_token = body["access_token"]
    expires_in = int(body.get("expires_in", 3600))
    expiry = time.time() + expires_in - EXPIRY_BUFFER_SECONDS
    return access_token, expiry

def get_token() -> str:
    """Return a valid access token, refreshing if necessary."""
    global _cached_token, _token_expiry
    with _lock:
        if _cached_token and time.time() < _token_expiry:
            return _cached_token
    # Fetch outside the lock so other requests aren't blocked on I/O.
    token, expiry = _fetch_token()
    with _lock:
        _cached_token = token
        _token_expiry = expiry
    print(f"Refreshed OAuth token (expires in {int(expiry - time.time())}s)", flush=True)
    return token

# ---------------------------------------------------------------------------
# ext_authz HTTP handler
# ---------------------------------------------------------------------------
class Handler(BaseHTTPRequestHandler):
    def do_any(self):
        try:
            token = get_token()
        except Exception as exc:
            print(f"OAuth token fetch failed: {exc}", flush=True)
            self.send_response(500)
            self.send_header("Content-Type", "text/plain")
            self.end_headers()
            self.wfile.write(b"OAuth token exchange failed")
            return

        self.send_response(200)
        # Replace the header name as needed - this header will be forwarded to the upstream LLM provider / gateway.
        self.send_header("Authorization", f"Bearer {token}")
        self.end_headers()

    # Handle every method Envoy might send for ext_authz checks.
    do_GET = do_POST = do_PUT = do_DELETE = do_PATCH = do_HEAD = do_OPTIONS = do_any

    def log_message(self, format, *args):
        # Quieter logs — only print errors.
        pass

if __name__ == "__main__":
    server = HTTPServer(("0.0.0.0", LISTEN_PORT), Handler)
    print(f"ext-authz-oauth listening on :{LISTEN_PORT}", flush=True)
    print(f"  token_url={TOKEN_URL} client_id=<redacted>", flush=True)
server.serve_forever()extAuthz 参数的完整列表,见 Helm chart README。
编写一个 ext_proc 变换器
当你需要重写请求或响应体时用 ext_proc,例如,在 OpenAI 格式和自定义网关格式之间转换,或向请求载荷注入额外字段。这使用 Envoy 的 ext_proc 过滤器。
与 ext_authz(HTTP)不同,ext_proc 使用一个双向 gRPC 流。Envoy 向你的变换器服务每个处理阶段(请求标头、请求体、响应标头、响应体)发一条消息,你的服务为每个阶段回复变更。你的变换器必须实现 envoy.service.ext_proc.v3.ExternalProcessor gRPC 服务。示例 Go 实现见 chart 仓库中的 e2e/transformer/。
何时用 ext_proc 对 ext_authz
| 能力 | ext_authz | ext_proc |
|---|---|---|
| 修改请求标头 | 是 | 是 |
| 修改响应标头 | 否 | 是 |
| 修改请求体 | 否 | 是 |
| 修改响应体 | 否 | 是 |
| 协议 | HTTP | gRPC |
如果你只需要注入 auth 标头(例如为 API 密钥)就用 ext_authz。如果你需要重写体就用 ext_proc。两者可同时启用。
在 values.yaml 中启用 ext_proc:
yaml
authProxy:
  transformer:
    enabled: true
    serviceUrl: "grpc://my-transformer:50051"
    timeout: "10s"
    failureModeAllow: false
    processingMode:
      requestHeaderMode: "SEND"
      requestBodyMode: "BUFFERED"
      responseHeaderMode: "SKIP"
responseBodyMode: "NONE"设 failureModeAllow: true 以便变换器不可用时放行请求。默认(false)拒绝请求。
处理模式
通过 processingMode 控制哪些阶段被发送到你的变换器。只启用你需要的阶段,因为禁用未用的阶段会降低延迟。
| 字段 | 选项 | 描述 |
|---|---|---|
requestHeaderMode | SEND、SKIP、DEFAULT | 是否转发请求标头。 |
responseHeaderMode | SEND、SKIP、DEFAULT | 是否转发响应标头。 |
requestBodyMode | NONE、BUFFERED、STREAMED、BUFFERED_PARTIAL | 如何发送请求体。 |
responseBodyMode | NONE、BUFFERED、STREAMED、BUFFERED_PARTIAL | 如何发送响应体。 |
requestTrailerMode | SEND、SKIP | 是否转发请求尾部。 |
responseTrailerMode | SEND、SKIP | 是否转发响应尾部。 |
- 对请求体重写用
BUFFERED:在发送前缓冲整个体,对 JSON 重写最简单。 - 对流式 LLM 响应体重写用
STREAMED:随块到达就发送,延迟更低但实现更复杂。 - 用一个
NONE完全跳过某阶段。
WARNING
在变更体时,你的 ext_proc 服务必须同时通过 HeaderMutation 更新 content-length 标头以匹配新的体大小。Envoy 会拒绝 content-length 与变更后体不匹配的响应。
请求流程
一个启用了 ext_proc 用于标头注入和体重写的例子:
curl -H "X-LangSmith-LLM-Auth: <JWT>" -d '{"model":"gpt-4",...}'
  -> Envoy(:10000)
  -> built-in Envoy JWT filter (validate sig, iss, aud)
  -> `ext_proc` filter -> transformer:50051 (gRPC)
    <- phase 1: request_headers -> mutate headers (inject Authorization)
    <- phase 2: request_body   -> mutate body (rewrite JSON) + update content-length
-> upstream LLM provider or gateway示例部署
下面的例子把一个最小 Go 变换器部署为一个 Kubernetes Deployment。它从请求标头读 JWT,注入一个 Authorization 标头,并把请求体从 OpenAI 格式重写为自定义格式。
transformer-configmap.yaml
yaml
apiVersion: v1
kind: ConfigMap
metadata:
  name: transformer-source
data:
  main.go: |
    package main

    import (
        "encoding/json"
        "fmt"
        "io"
        "log"
        "net"
        "strings"

        core "github.com/envoyproxy/go-control-plane/envoy/config/core/v3"
        ext_proc "github.com/envoyproxy/go-control-plane/envoy/service/ext_proc/v3"
        "google.golang.org/grpc"
    )

    type server struct {
        ext_proc.UnimplementedExternalProcessorServer
    }

    func (s *server) Process(stream ext_proc.ExternalProcessor_ProcessServer) error {
        for {
            req, err := stream.Recv()
            if err == io.EOF {
                return nil
            }
            if err != nil {
                return err
            }

            var resp *ext_proc.ProcessingResponse
            switch v := req.Request.(type) {
            case *ext_proc.ProcessingRequest_RequestHeaders:
                resp = handleRequestHeaders(v.RequestHeaders)
            case *ext_proc.ProcessingRequest_RequestBody:
                resp = handleRequestBody(v.RequestBody)
            default:
                resp = &ext_proc.ProcessingResponse{}
            }

            if err := stream.Send(resp); err != nil {
                return err
            }
        }
    }

    func handleRequestHeaders(headers *ext_proc.HttpHeaders) *ext_proc.ProcessingResponse {
        var jwtValue string
        for _, h := range headers.Headers.Headers {
            if strings.EqualFold(h.Key, "x-langsmith-llm-auth") {
                if len(h.RawValue) > 0 {
                    jwtValue = string(h.RawValue)
                } else {
                    jwtValue = h.Value
                }
                break
            }
        }

        resp := &ext_proc.ProcessingResponse{
            Response: &ext_proc.ProcessingResponse_RequestHeaders{
                RequestHeaders: &ext_proc.HeadersResponse{},
            },
        }

        if jwtValue != "" {
            // TODO: Replace with your auth logic, e.g. exchange JWT for a
            // provider-specific token, call a secrets manager, etc.
            providerKey := "Bearer your-provider-key"

            headerResp := resp.GetRequestHeaders()
            headerResp.Response = &ext_proc.CommonResponse{
                HeaderMutation: &ext_proc.HeaderMutation{
                    SetHeaders: []*core.HeaderValueOption{
                        {
                            Header: &core.HeaderValue{
                                Key:      "Authorization",
                                RawValue: []byte(providerKey),
                            },
                        },
                    },
                },
            }
        }
        return resp
    }

    func handleRequestBody(body *ext_proc.HttpBody) *ext_proc.ProcessingResponse {
        resp := &ext_proc.ProcessingResponse{
            Response: &ext_proc.ProcessingResponse_RequestBody{
                RequestBody: &ext_proc.BodyResponse{},
            },
        }

        var original map[string]interface{}
        if err := json.Unmarshal(body.Body, &original); err != nil {
            log.Printf("Body parse failed, passing through: %v", err)
            return resp
        }

        // TODO: Replace with your transformation logic.
        // This example wraps the OpenAI-format body in a custom envelope.
        transformed := map[string]interface{}{
            "custom_model":    original["model"],
            "custom_messages": original["messages"],
            "metadata":        map[string]string{"source": "langsmith"},
        }

        newBody, err := json.Marshal(transformed)
        if err != nil {
            log.Printf("Body marshal failed, passing through: %v", err)
            return resp
        }

        // IMPORTANT: update content-length to match the new body size.
        bodyResp := resp.GetRequestBody()
        bodyResp.Response = &ext_proc.CommonResponse{
            Status: ext_proc.CommonResponse_CONTINUE_AND_REPLACE,
            HeaderMutation: &ext_proc.HeaderMutation{
                SetHeaders: []*core.HeaderValueOption{
                    {
                        Header: &core.HeaderValue{
                            Key:      "content-length",
                            RawValue: []byte(fmt.Sprintf("%d", len(newBody))),
                        },
                    },
                },
            },
            BodyMutation: &ext_proc.BodyMutation{
                Mutation: &ext_proc.BodyMutation_Body{
                    Body: newBody,
                },
            },
        }
        return resp
    }

    func main() {
        lis, err := net.Listen("tcp", ":50051")
        if err != nil {
            log.Fatalf("failed to listen: %v", err)
        }
        s := grpc.NewServer()
        ext_proc.RegisterExternalProcessorServer(s, &server{})
        log.Println("transformer listening on :50051")
        if err := s.Serve(lis); err != nil {
            log.Fatalf("failed to serve: %v", err)
        }
    }
  go.mod: |
    module transformer

    go 1.23

    require (
        github.com/envoyproxy/go-control-plane/envoy v1.32.4
        google.golang.org/grpc v1.72.1
)transformer-deployment.yaml
yaml
apiVersion: apps/v1
kind: Deployment
metadata:
  name: transformer
  labels:
    app: transformer
spec:
  replicas: 1
  selector:
    matchLabels:
      app: transformer
  template:
    metadata:
      labels:
        app: transformer
    spec:
      initContainers:
        - name: build
          image: golang:1.23
          command: ["sh", "-c"]
          args:
            - |
              cp /src/main.go /src/go.mod /build/ &&
              cd /build &&
              go mod tidy &&
              CGO_ENABLED=0 go build -o /build/transformer ./main.go
          volumeMounts:
            - name: source
              mountPath: /src
              readOnly: true
            - name: binary
              mountPath: /build
      containers:
        - name: transformer
          image: gcr.io/distroless/static-debian12:nonroot
          command: ["/app/transformer"]
          ports:
            - containerPort: 50051
          volumeMounts:
            - name: binary
              mountPath: /app
              readOnly: true
      volumes:
        - name: source
          configMap:
            name: transformer-source
        - name: binary
          emptyDir: {}
---
apiVersion: v1
kind: Service
metadata:
  name: transformer
  labels:
    app: transformer
spec:
  selector:
    app: transformer
  ports:
    - port: 50051
      targetPort: 50051
protocol: TCPNOTE
对于生产,预构建一个容器镜像而非在 init 容器中编译。示例多阶段构建见 Helm chart 仓库中的 e2e/transformer/Dockerfile。
额外配置
HTTP 代理
Envoy 不理会 HTTP_PROXY、HTTPS_PROXY 或 NO_PROXY 环境变量。显式配置一个 HTTP 代理:
yaml
authProxy:
  httpProxy:
    enabled: true
    host: "proxy.example.com"
    port: 3128
    noProxy:
      - "internal.corp"
- ".internal.corp"不带公共 ingress 部署
当 auth 代理没有公共 ingress、只能通过内部 Kubernetes 网络访问时,LangSmith 服务必须被配置为允许向私有 IP 地址的出站请求。没有这些设置,内置的 SSRF 保护会阻止向私有 IP 的请求。
把以下环境变量添加到你的 LangSmith values.yaml:
SSRF_ALLOW_K8S_INTERNAL— 在所有发起 LLM 调用的服务上必需。把它加到支持它的服务的commonEnv,或加到不支持commonEnv的服务各自的extraEnv。SSRF_ALLOW_PRIVATE_IPS_PLAYGROUND— 仅在playground服务上必需。把它加到playground.deployment.extraEnv。
yaml
# Allow all LLM-calling services to reach the auth proxy on private IPs
commonEnv:
  - name: SSRF_ALLOW_K8S_INTERNAL
    value: "true"

# Allow the playground service to reach the auth proxy on private IPs
playground:
  deployment:
    extraEnv:
      - name: SSRF_ALLOW_K8S_INTERNAL
        value: "true"
      - name: SSRF_ALLOW_PRIVATE_IPS_PLAYGROUND
value: "true"如果 commonEnv 在你部署中不适用于所有所需服务,就通过每个发起 LLM 调用服务的 extraEnv 单独设置 SSRF_ALLOW_K8S_INTERNAL。
其他选项
ingress、自动伸缩、资源限制和其他配置选项,见 Helm chart README。
TIP
为了生产可靠性,把 authProxy.autoscaling.hpa.minReplicas 至少设为 3。
完整配置例子
yaml
authProxy:
  upstream: "https://gateway.example.com"   # your LLM gateway or provider
  jwtIssuer: "langsmith"                    # must match LLM_AUTH_PROXY_ISSUER on LangSmith
  jwtAudiences:
    - "example-audience"                    # must match org setting in LangSmith

  # Option A: remote JWKS (recommended for production)
  # Envoy fetches and caches public keys from LangSmith's /.well-known/jwks.json endpoint.
  jwksUri: "https://langsmith.example.com/.well-known/jwks.json"   # self-hosted
  # jwksUri: "https://api.smith.langchain.com/.well-known/jwks.json"  # SaaS
  jwksCacheDurationSeconds: 300             # how long Envoy caches the JWKS (default 5 min)

  # Option B: inline JWKS (testing or air-gapped environments only)
  # jwksJson: '{"keys": [...]}'

  # ext_authz: header-only auth logic (include only if needed)
  # Use this to inject, remove, or modify authorization headers.
  # Your service receives an HTTP request at /check with the validated JWT
  # in the x-langsmith-llm-auth header and responds with headers to inject upstream.
  extAuthz:
    enabled: true
    serviceUrl: "http://localhost:10002"    # sidecar URL
    # serviceUrl: "http://ext-authz.<namespace>.svc.cluster.local:10002"  # separate deployment
    sendBody: false                         # set true to include request body

  # transformer: request/response body transformation (include only if needed)
  # Use this when you need to rewrite request or response bodies (e.g. OpenAI -> custom format).
  # Can be enabled alongside ext_authz.
  transformer:
    enabled: true
    serviceUrl: "grpc://transformer.<namespace>.svc.cluster.local:50051"
    timeout: "10s"
    failureModeAllow: false                 # reject if transformer is unavailable
    processingMode:
      requestHeaderMode: "SEND"             # forward request headers (read JWT, inject auth)
      responseHeaderMode: "SKIP"            # skip response headers
      requestBodyMode: "BUFFERED"           # buffer full body for JSON rewriting
      responseBodyMode: "NONE"              # skip response body
      requestTrailerMode: "SKIP"
responseTrailerMode: "SKIP"JWT 声明参考
LangSmith 用 Ed25519(EdDSA) 签名 JWT。公钥在 /.well-known/jwks.json 上服务并由代理自动拉取。auth 代理用这些公钥验证签名。
| 声明 | 描述 |
|---|---|
iat、exp、jti、nbf | 标准 JWT 声明(签发时间、过期、JWT ID、生效前) |
iss | 签发者。SaaS 为 langsmith;自托管用 LLM_AUTH_PROXY_ISSUER 设置 |
aud | 受众。匹配 LangSmith 组织设置中的 JWT 受众 |
sub | 主体标识符(用户 ID、评估器 ID、助手 ID 或 API 密钥 ID) |
actor_type | 以下之一:user、evaluator、agent-builder、insights、polly、api_key:pat(个人访问令牌)或 api_key:service(服务账户密钥) |
workspace_id | 工作区 ID |
workspace_name | 工作区名 |
organization_id | 组织 ID |
organization_name | 组织名 |
request_id | 请求关联 ID |
ls_user_id | LangSmith 用户 ID(只要请求有关联用户就存在) |
WARNING
用 ls_user_id 来识别终端用户。在 agent 运行上,sub 是助手的 ID 且 actor_type 是 agent-builder,所以两者都不识别那个人。
JWT 在 x-langsmith-llm-auth 请求标头中传递给你的 ext_authz 或变换器服务。
常见问题
auth 代理支持企业代理吗?
支持。通过 values.yaml 中的 httpProxy 部分配置一个 HTTP 代理。详情见 HTTP 代理。
auth 代理支持自定义证书吗?
支持,通过 customCa 用于自定义 CA 证书,通过 mtls 用于双向 TLS。
单个 auth 代理能路由到多个上游 LLM 网关吗?
不能。auth 代理只有一个 upstream 字段。
auth 代理能为多个组织服务吗?
能。多个组织能通过它们在 LangSmith 中的模型配置指向同一个 auth 代理实例。
LangSmith 到 auth 代理的连接能用 HTTP 而非 HTTPS 吗?
能,但仅在自托管中,我们通常建议把 auth 代理放在一个专属 ingress 之后,使通信用 HTTPS。要允许 HTTP,在你的 LangSmith values.yaml 中的 commonEnv 和 playground.deployment.extraEnv 添加 LLM_AUTH_PROXY_ACCEPT_HTTP。 要为 Chat 和 Insights 启用向 auth 代理的 HTTP 流量,在各自的 extraEnv 部分设置这个环境变量:config.polly.agent.extraEnv(用于 Chat,它曾叫 Polly)和 config.insights.agent.extraEnv。
auth 代理不需要公共 ingress 也能工作吗?
能。当 auth 代理只能通过内部 Kubernetes 网络访问(无公共 ingress)时,把 SSRF_ALLOW_K8S_INTERNAL 添加到所有发起 LLM 调用的服务,并把 SSRF_ALLOW_K8S_INTERNAL 和 SSRF_ALLOW_PRIVATE_IPS_PLAYGROUND 都添加到 playground 服务。配置详情见不带公共 ingress 部署。
何时该用 LLM auth 代理,而非模型配置上的 OAuth 客户端凭据?
当身份验证需要超出 OAuth2 client_credentials 的自定义逻辑时,用 LLM auth 代理。例如,把 LangSmith JWT 交换为提供商专属令牌、注入 GCP 或 AWS 身份,或重写请求和响应体。当每个工作区或团队需要对自己到自定义网关的 OAuth2 client_credentials 做自助控制时,用模型配置上的 OAuth 客户端凭据。两者可以在同一组织内共存;路由按配置。
Helm chart 参考
可配置值的完整列表,见 Helm chart README。