
主题
在构建智能体或 RAG 流程时,只把文字解析出来往往不够。用户和应用经常需要你展示这些文字来自哪里。
LiteParse 会为每个文字项给出空间坐标,还能给出页面截图,于是你可以在渲染出的页面上精确高亮某个区域。
边界框是怎么工作的
以 JSON 输出解析文档时,每一页都带一份文字项列表 —— 每个抽出的文字元素都有它的位置(x、y、width、height)与内容。
终端窗口
lit parse document.pdf --format json{
"pages": [
{
"page": 1,
"width": 612,
"height": 792,
"text": "Revenue grew 15% ...",
"text_items": [
{
"text": "Revenue grew 15%",
"x": 72,
"y": 200,
"width": 150,
"height": 12
}
]
}
]
}坐标单位是 PDF 点(1 点 = 1/72 英寸)。原点位于页面左上角,X 向右增大,Y 向下增大。
JSON 输出用 snake_case(
text_items、page)。Node 绑定用 camelCase(textItems、pageNum),Python 用 snake_case(text_items、page_num)。下面的示例各按自己语言的命名书写。
库用法
库允许你在一个脚本里同时完成「为边界框解析」与「生成截图」。例如搜索“0°C to 70°C”,并展示它出现在哪里:
- TypeScript
- Python
TypeScript
import { LiteParse, searchItems } from "@llamaindex/liteparse";

const parser = new LiteParse({ outputFormat: "json" });
const result = await parser.parse("report.pdf");

for (const page of result.pages) {
  const matches = searchItems(page.textItems, { phrase: "0°C to 70°C" });
  for (const match of matches) {
    console.log(`Found "${match.text}" at (${match.x}, ${match.y}) ${match.width}×${match.height}`);
  }
}Python
from liteparse import LiteParse, search_items

parser = LiteParse()
result = parser.parse("report.pdf")

for page in result.pages:
    matches = search_items(page.text_items, "0°C to 70°C")
    for match in matches:
print(f'Found "{match.text}" at ({match.x}, {match.y}) {match.width}×{match.height}')把坐标换算成图片像素
文字项坐标是 PDF 点,而截图是像素。要在截图上画出高亮,需要先对坐标做缩放:
const scaleFactor = dpi / 72; // PDF points -> pixels at your chosen DPI

function itemToPixels(item, dpi = 150) {
  const scale = dpi / 72;
  return {
    x: item.x * scale,
    y: item.y * scale,
    width: item.width * scale,
    height: item.height * scale,
  };
}例如在默认的 150 DPI 下,缩放系数是 150 / 72 ~ 2.08,于是位于 (72, 200) 的文字项对应像素 (150, 416)。
完整示例:用 sharp 绘制引用高亮
下面是一条完整的流程:解析 PDF、搜索一个短语,并在页面截图上画出黄色高亮框:
import { LiteParse, searchItems } from "@llamaindex/liteparse";
import sharp from "sharp";

const DPI = 150;
const SCALE = DPI / 72;

async function main() {
  const parser = new LiteParse({ outputFormat: "json", dpi: DPI });

  const result = await parser.parse("manual.pdf");
  const screenshots = await parser.screenshot("manual.pdf");

  // Search for a phrase, grouped by page
  const query = "0°C to 70°C";
  const hitsByPage = new Map<number, Array<{ x: number; y: number; width: number; height: number }>>();

  for (const page of result.pages) {
    const matches = searchItems(page.textItems, { phrase: query });
    if (matches.length) hitsByPage.set(page.pageNum, matches);
  }

  // Draw all highlights per page into a single image
  for (const [pageNum, rects] of hitsByPage) {
    const shot = screenshots.find((s) => s.pageNum === pageNum);
    if (!shot) continue;

    const composites = await Promise.all(
      rects.map(async (rect) => {
        const pixel = {
          left: Math.round(rect.x * SCALE),
          top: Math.round(rect.y * SCALE),
          width: Math.round(rect.width * SCALE),
          height: Math.round(rect.height * SCALE),
        };

        const overlay = await sharp({
          create: {
            width: pixel.width,
            height: pixel.height,
            channels: 4,
            background: { r: 255, g: 255, b: 0, alpha: 0.3 },
          },
        })
          .png()
          .toBuffer();

        return { input: overlay, left: pixel.left, top: pixel.top };
      })
    );

    const highlighted = await sharp(shot.imageBuffer)
      .composite(composites)
      .png()
      .toBuffer();

    await sharp(highlighted).toFile(`citation_page${pageNum}.png`);
    console.log(`Saved citation_page${pageNum}.png (${rects.length} highlights)`);
  }
}

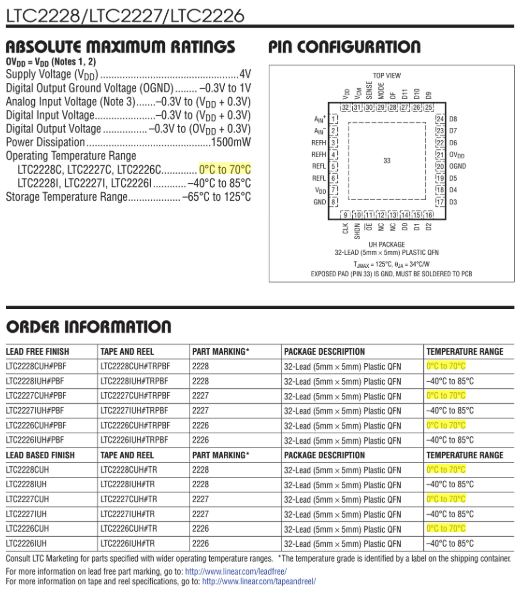
main().catch(console.error);对某个 PDF 运行这个脚本,会产出把搜索短语高亮出来的新图片,精确展示该信息在页面上的位置。
CLI 用法
解析为 JSON 以取得边界框:
终端窗口
lit parse document.pdf --format json -o result.json同时生成页面截图:
终端窗口
lit screenshot document.pdf -o ./screenshots之后,你(或一个智能体)就可以用手头任何工具,按需处理得到的 JSON 与截图。
小贴士
parse()与screenshot()要用同一个dpi值。两者默认都是150。- JSON 里页面的
width与height以 PDF 点计,与坐标空间一致。要把坐标归一化成百分比时就用它们。 - 要做多词短语搜索,请遍历
textItems并检查相邻项 —— 一个短语可能跨多个文字项。 - 想高亮整个标题、段落或表格而不是逐个词,请用
extract_blocks解析。每个块自带一个覆盖其所有来源行的bbox,因此无需自己拼接文字项就能框出某个区域 —— 表格单元格也各自带框,可用于单元格级引用。